Maple banana bread lands with a softer sweetness than the usual brown-sugar version, and that shift changes the whole loaf. The crumb stays tender and moist, the top bakes up deep golden, and every slice carries that warm maple note all the way through instead of just reading as “banana bread with something extra.” It feels familiar, but the flavor is fuller and more rounded.
This version works because the maple syrup does more than sweeten. It brings moisture, so the batter needs a gentle hand and just enough flour to hold together without turning heavy. The bananas do the fruit-heavy lifting, the butter adds richness, and the spices keep the loaf from tasting flat. Brushing the hot top with a little warm maple syrup at the end gives you that glossy finish and a stronger maple hit right where your nose meets the slice.
Below, I’m walking through the small details that matter here: how ripe the bananas need to be, why the loaf can sink if it’s overmixed, and what to do if you want to swap the nuts or leave them out. It’s a simple loaf, but the difference between good and great is in the handling.
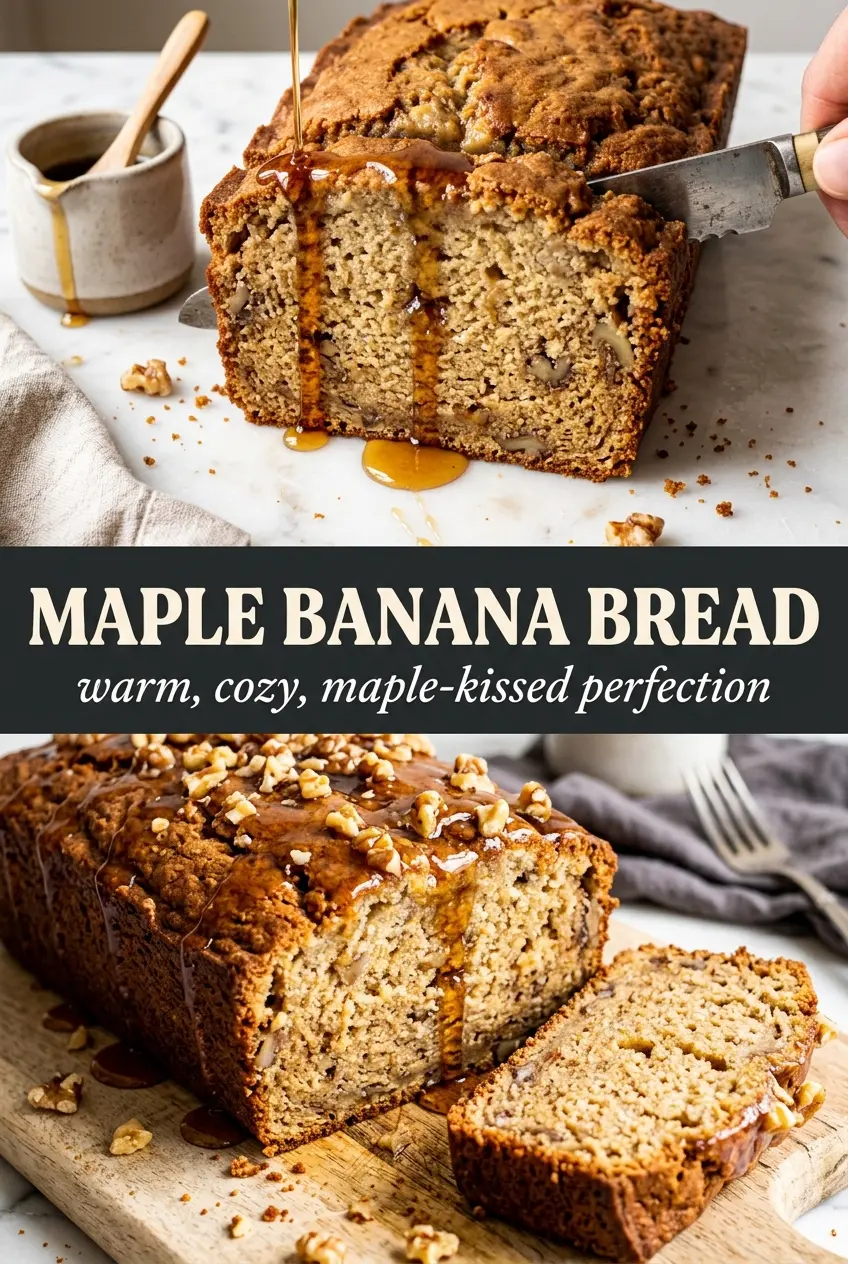
The maple flavor came through in every bite, and the top brushed with syrup turned sticky and glossy instead of just sweet. Mine baked up with a tender crumb and the pecans stayed nicely toasted.
Save this maple banana bread for the days when you want a tender loaf with real maple flavor and toasted nuts in every slice.
The Part That Keeps Maple Banana Bread From Turning Heavy
Maple syrup changes the structure of banana bread more than people expect. It’s liquid sweetener, so if you treat it like a dry sugar swap and start adding extra flour, the loaf turns dense and tight instead of tender. The goal is a batter that looks thick but still slides off the spoon in ribbons. That’s what gives you a moist crumb without a gummy center.
The other place this loaf goes sideways is mixing. Once the flour goes in, stop as soon as you no longer see dry streaks. Overmixing develops the flour and pushes the loaf toward a chewy, tunneling texture. If your bananas are very large and wet, the batter may look softer than you expect, but that’s normal. The oven will set it if you leave the structure alone.
What Each Ingredient Is Actually Doing Here

- Ripe bananas — Use bananas with plenty of brown spots and a soft, fragrant peel. They bring sweetness, moisture, and the strong banana flavor that anchors the loaf. If your bananas aren’t ripe enough, the bread tastes flat and needs more sweetener than this recipe is built for.
- Pure maple syrup — This is the ingredient that makes the loaf taste distinct. Use real maple syrup, not pancake syrup, or you’ll lose that deep woody sweetness and the batter can taste one-note. It also keeps the crumb supple, which is why the loaf stays soft on day two.
- Melted butter — Butter adds richness and helps the crust brown. Oil would make the loaf a little more tender, but it wouldn’t give the same flavor. Let it cool slightly before mixing so it doesn’t scramble the egg.
- Cinnamon and nutmeg — These don’t make the loaf taste spicy; they make the banana and maple read warmer and fuller. Nutmeg especially helps the maple flavor stand out. Freshly grated nutmeg is nice, but the jarred kind works fine here.
- Pecans or walnuts — Toasty nuts add contrast against the soft crumb. Chop them medium, not fine, so you still get texture in each slice. If you leave them out, the loaf will still work, but it’ll be softer and a little less complex.
Building the Batter and Baking It Until the Center Sets
Start with the wet ingredients
Mash the bananas until mostly smooth, then whisk in the melted butter, maple syrup, egg, and vanilla. You want the mixture glossy and well blended before the flour goes in. If the butter is too hot, it can cook the egg on contact, so let it cool for a few minutes first. A few tiny banana lumps are fine; big chunks make the loaf bake unevenly.
Fold in the dry ingredients gently
Add the flour, baking soda, cinnamon, nutmeg, and salt all at once, then fold just until the streaks disappear. Stop early rather than late. The batter should look thick and spoonable, not airy or whipped. Fold in the nuts last so they stay distributed instead of sinking.
Bake for color, not just time
Scrape the batter into a greased 9×5 loaf pan and bake at 350°F until the top is deep golden and a toothpick comes out clean or with a few moist crumbs. The center should feel set when you press lightly on the top. If the top is browning fast but the middle is still loose, tent it loosely with foil for the last part of baking. Pulling it too soon is the fastest way to end up with a gummy middle.
Brush and cool while the loaf is still warm
As soon as the loaf comes out of the oven, brush the top with warm maple syrup. The heat helps it soak in just enough to glaze the crust without making it sticky-wet. Let the bread sit in the pan for about 15 minutes before turning it out. If you unmold it too early, the loaf can break while it’s still fragile.
How to Adapt This Loaf for Different Pans and Dietary Needs
Walnut Swap for a More Classic Banana Bread Finish
Use walnuts instead of pecans if you want a slightly more bitter, old-school banana bread contrast. Walnuts are a little softer in flavor and work especially well if you like the maple to stay front and center.
Dairy-Free Version
Swap the butter for melted coconut oil or a neutral oil. Coconut oil gives a faint coconut note and still browns nicely, while neutral oil makes the loaf a little softer and less rich. The rest of the recipe stays the same.
Gluten-Free Bread That Still Holds Together
Use a cup-for-cup gluten-free flour blend with xanthan gum already included. The crumb will be slightly more delicate, so let the loaf cool fully before slicing. If your blend is very starchy, add an extra tablespoon of banana or a spoonful of yogurt to keep the texture from drying out.
Mini Loaves for Gifting or Faster Baking
Divide the batter between smaller loaf pans and start checking early. Mini loaves bake faster and give you more crust, but they dry out sooner if you leave them in too long. Watch for the same deep golden color and a clean toothpick, then cool them before wrapping.
Storage and Reheating
- Refrigerator: Store tightly wrapped for up to 4 days. The crumb firms up a bit in the fridge, but the maple flavor stays strong.
- Freezer: This loaf freezes well. Wrap individual slices or the whole cooled loaf in plastic, then foil, and freeze for up to 3 months.
- Reheating: Warm slices in the toaster oven or microwave just until soft and fragrant. Don’t overheat them or the maple syrup brushing on top can turn sticky and the crumb can dry out.
Answers to the Questions Worth Asking
Maple Banana Bread
Ingredients
Equipment
Method
- Preheat the oven to 350°F and grease a 9x5 loaf pan, so the batter bakes evenly right away.
- Whisk melted butter, maple syrup, egg, and vanilla into the mashed bananas until smooth, with no visible egg streaks.
- Fold in flour, baking soda, cinnamon, nutmeg, and salt until just combined, stopping as soon as you don’t see dry flour.
- Fold in the chopped pecans or walnuts until evenly distributed through the batter.
- Pour the batter into the prepared pan and bake for 60–70 minutes, until the top turns deep golden and a toothpick comes out clean.
- Immediately brush the top with 1–2 tablespoons of warm maple syrup while the loaf is still hot, for an amber sheen.
- Cool for 15 minutes in the pan before unmolding, so slices hold together.