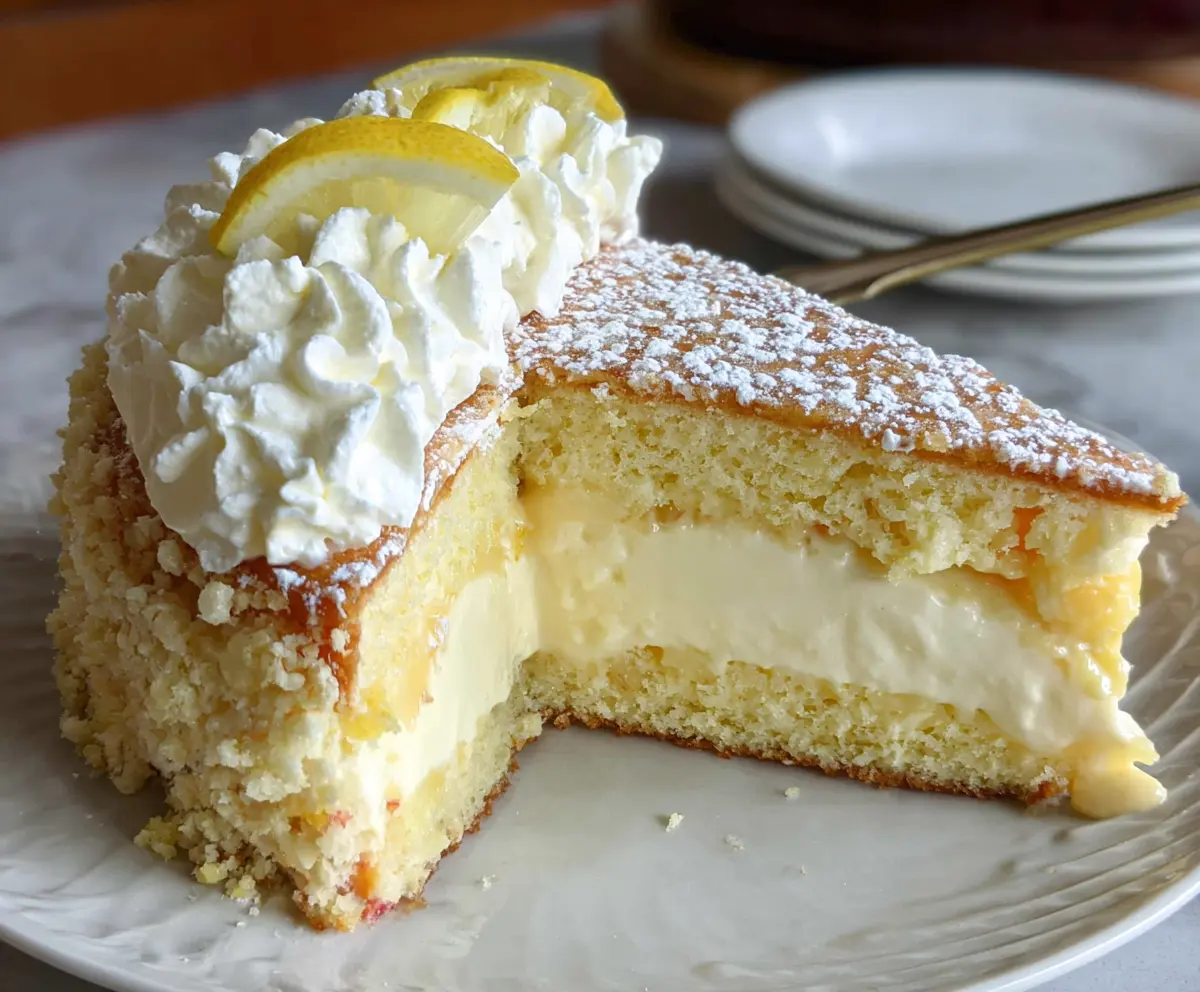
The Cheesecake Factory Italian Lemon Cream Cake is a bright and delicious treat filled with layers of light cake and tangy lemon cream. It blends the smooth texture of a classic cheesecake with a fresh lemony twist that feels just right—creamy, zesty, and truly satisfying.
I love this cake because it’s not too heavy, making it perfect for when you want something sweet but not overwhelming. The lemon cream filling adds a little zing that wakes up your taste buds without being too sour, and the soft cake layers balance it all out beautifully. Every bite feels like a fresh, sunny day.
When I serve this cake, I like to add a dollop of whipped cream on top and maybe a few fresh berries to make it even more special. It’s perfect for sharing with friends or family during celebrations or just as a special dessert after dinner. If you enjoy lemon treats, this cake is a wonderful way to bring a bit of Italian-inspired sunshine to your table.
Key Ingredients & Substitutions
Lemon zest and juice: Fresh lemon zest is key for bright flavor. If you can’t get fresh lemons, bottled lemon juice works but fresh is best for zing. I find Meyer lemons give a sweeter, softer lemon flavor if you want to try something different.
Cream cheese: Use full-fat cream cheese for the smoothest, creamiest filling. Light or low-fat versions can make the filling less rich and a bit runny.
Butter: Unsalted butter lets you control salt levels. If needed, salted butter is fine just reduce added salt slightly in the cake batter.
Heavy cream: Heavy cream whipped to soft peaks makes the filling light and fluffy. If you want a lower-fat option, try whipping half-and-half with a stabilizer, but results won’t be as rich.
Flour and baking powder: All-purpose flour works best for a tender crumb. Make sure your baking powder is fresh for proper rise.
How Do You Make the Lemon Curd Without It Becoming Gritty or Scrambled?
Making smooth lemon curd can be tricky since eggs cook quickly. Here’s what helps:
- Whisk lemon juice, zest, sugar, and eggs together fully before heating.
- Cook on medium heat, stirring constantly to stop eggs from curdling.
- Don’t let it boil—remove from heat as soon as it thickens to a custard-like texture.
- Stir in cold butter off the heat for a silky finish.
- Cover surface with plastic wrap to prevent skin and chill promptly.
Taking your time and constant stirring are the secrets to smooth lemon curd every time.
Equipment You’ll Need
- Two 8-inch round cake pans – I like these because they heat evenly and make layered cakes easy to assemble.
- Mixing bowls – great for whisking and mixing ingredients smoothly.
- Hand or stand mixer – speeds up beating the butter, sugar, and whipped cream and creates a lighter texture.
- Saucepan – necessary for cooking the lemon curd to a smooth consistency.
- Rubber spatula – perfect for stirring thick curd and folding whipped cream without deflating it.
- Cooling racks – help cakes cool evenly before frosting.
- Cake leveler or serrated knife – makes slicing layers even and easier.
Flavor Variations & Add-Ins
- Mix in fresh berries or blueberries between layers for extra freshness and color.
- Swap lemon zest and juice for lime or orange zest for citrus variety.
- Add a splash of Grand Marnier or lemon liqueur for a boozy twist.
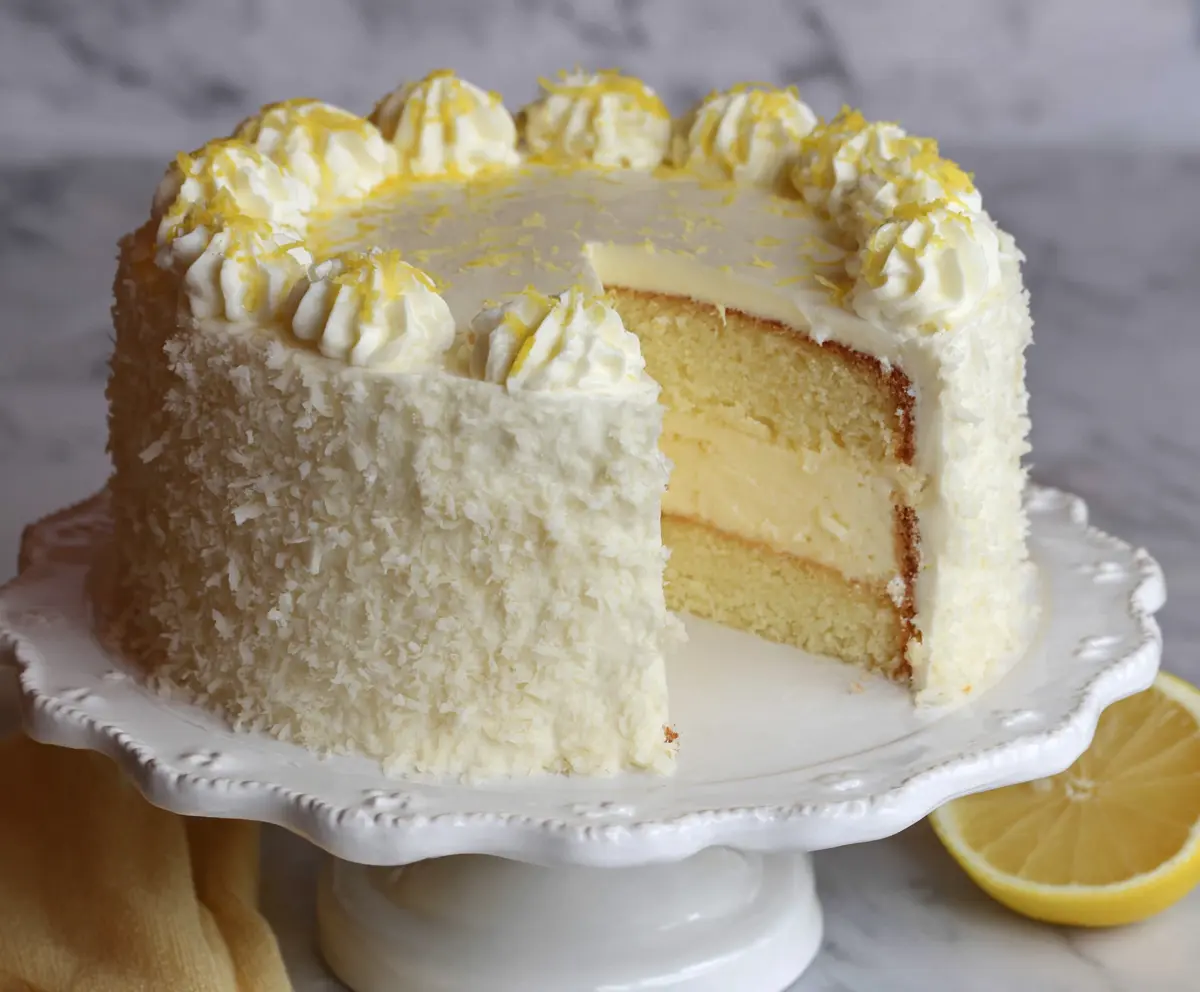
- Top with toasted coconut or candied lemon slices for texture and visual appeal.
Cheesecake Factory Italian Lemon Cream Cake
Ingredients You’ll Need:
For the Cake:
- 1 ½ cups all-purpose flour
- 1 ½ teaspoons baking powder
- ¼ teaspoon salt
- ¾ cup unsalted butter, softened
- 1 cup granulated sugar
- 3 large eggs
- 2 teaspoons vanilla extract
- 2 tablespoons lemon zest (from about 2 lemons)
- ½ cup whole milk
For the Lemon Cream Filling:
- 8 oz cream cheese, softened
- 1 cup powdered sugar
- 1 teaspoon vanilla extract
- 1 cup heavy cream, whipped to soft peaks
- 2 tablespoons fresh lemon juice
- 1 tablespoon lemon zest
For the Lemon Curd Layer:
- ½ cup fresh lemon juice (about 2 lemons)
- 1 tablespoon lemon zest
- ¾ cup granulated sugar
- 3 large eggs
- 4 tablespoons unsalted butter
For the Topping and Garnish:
- 1 cup heavy whipping cream
- 2 tablespoons powdered sugar
- Lemon slices, for garnish
- Powdered sugar, for dusting
- Crumbled cake crumbs or white chocolate crumbs for coating edges (optional)
How Much Time Will You Need?
This cake will take about 40 minutes to prepare and bake, plus another 2 hours for the lemon curd to chill and set. After assembling, chill the cake for 2-3 hours to allow the layers to firm up. Altogether, plan for around 4 to 5 hours from start to finish, mostly hands-off chilling time.
Step-by-Step Instructions:
1. Prepare the Cake Layers:
Start by preheating your oven to 350°F (175°C). Grease and flour two 8-inch round cake pans. In a medium bowl, whisk together the flour, baking powder, and salt.
In a large bowl, beat the softened butter and sugar until fluffy and light. Add the eggs one by one, beating well after each. Mix in vanilla extract and lemon zest.
Now add the flour mixture and milk alternately to the butter mixture, starting and ending with the flour. Stir just until combined.
Divide the batter evenly between the pans and smooth the tops. Bake for 25-30 minutes, until a toothpick comes out clean. Let cakes cool completely in their pans on racks, then remove carefully.
2. Make the Lemon Curd:
In a saucepan, whisk together lemon juice, lemon zest, sugar, and eggs. Place over medium heat and stir constantly until thickened to a creamy custard-like texture (about 6-8 minutes). Be careful not to let it boil.
Remove from heat and stir in butter until smooth and melted. Transfer to a bowl and cover the surface with plastic wrap to prevent a skin. Chill for about 2 hours until set.
3. Prepare the Lemon Cream Filling:
Beat cream cheese with powdered sugar and vanilla until smooth. Fold in the fresh lemon juice and zest.
Gently fold in the whipped heavy cream, keeping the texture light and fluffy. Keep this filling chilled until you’re ready to assemble the cake.
4. Assemble the Cake:
Slice each cake layer in half horizontally, making 4 cake layers total.
Place one layer on your serving plate and spread a thin layer of lemon curd over it. Top with a thick layer of lemon cream filling.
Repeat the layers, finishing with a cake layer on top. Spread a thin coat of lemon curd around the edges and over the top for a glossy finish.
5. Decorate the Cake:
Whip the heavy cream with powdered sugar until stiff peaks form. Either pipe or spread the whipped cream over the top.
Add lemon slices to garnish beautifully. For extra texture, you can press crumbled cake or white chocolate crumbs onto the sides. Dust the top lightly with powdered sugar.
6. Chill and Serve:
Refrigerate the cake for at least 2-3 hours so it sets nicely. When ready, slice and enjoy this creamy, zesty dessert at its best chilled.
Can I Use Frozen Lemon Juice or Pre-made Lemon Curd?
Yes, you can use frozen lemon juice that’s been thawed, but fresh lemon juice really brightens the flavor. Pre-made lemon curd can save time—just make sure it’s thick and spreadable before layering.
How Long Can I Store Leftover Cake?
Store leftover cake in an airtight container in the fridge for up to 3-4 days. Let it come to room temperature for about 15 minutes before serving for the best texture.
Can I Make This Cake Ahead of Time?
Absolutely! You can prepare the cake layers, lemon curd, and lemon cream filling a day ahead. Assemble the cake and chill overnight to let the flavors meld perfectly.
What Can I Substitute for Heavy Cream?
If you don’t have heavy cream, you can try whipping full-fat coconut cream as a dairy-free alternative, but it may slightly change the flavor and texture. Half-and-half won’t whip properly for the filling.